Работа с мобильным устройством с помощью adb connect
ADB (Android Debug Bridge) является утилитой для отладки и тестирования приложений на устройствах Android. Она позволяет подключаться к устройству, управлять им и получать доступ к его файловой системе, логам и другим ресурсам. В этой статье мы рассмотрим, как использовать adb connect для подключения к устройству через Wi-Fi.
Подключение устройства через Wi-Fi
Подключение устройства через Wi-Fi может быть полезным, если вы работаете с устройством на расстоянии от компьютера или не хотите использовать кабель USB. Для подключения устройства через Wi-Fi необходимо выполнить следующие шаги:
- Подключите устройство к компьютеру через USB-кабель.
- Откройте терминал и выполните команду adb tcpip 5555.
- Отключите устройство от компьютера.
- Подключите устройство к той же Wi-Fi-сети, что и компьютер.
- Найдите IP-адрес устройства в настройках Wi-Fi.
- В терминале выполните команду adb connect :5555.
После выполнения этих шагов устройство будет подключено к компьютеру через Wi-Fi. Вы можете использовать все функции ADB, как и при подключении через USB.
Ошибки при подключении
При подключении устройства через Wi-Fi могут возникать ошибки. Например, устройство может не быть доступно по Wi-Fi или на компьютере может быть запущено несколько экземпляров ADB, что может привести к конфликту. Если у вас возникли проблемы при подключении устройства через Wi-Fi, попробуйте выполнить следующие действия:
- Убедитесь, что устройство и компьютер подключены к одной Wi-Fi-сети.
- Убедитесь, что на устройстве включен режим разработчика и отладка по USB.
- Перезапустите устройство и компьютер.
- Выполните команду adb kill-server, чтобы остановить все экземпляры ADB, и затем выполните команду adb start-server, чтобы запустить новый экземпляр.
Использование adb connect
После подключения устройства через Wi-Fi с помощью adb connect, вы можете использовать все функции ADB, как и при подключении через USB. Ниже приведены некоторые из основных команд ADB, которые вы можете использовать:
- adb devices — показывает список всех подключенных устройств
- adb shell — запускает оболочку Linux на устройстве
- adb push — копирует файлы с компьютера на устройство
- adb pull — копирует файлы с устройства на компьютер
- adb logcat — показывает журнал системных сообщений
Заключение
ADB connect — это мощный инструмент для подключения к устройству через Wi-Fi. Он позволяет управлять устройством и получать доступ к его ресурсам, не используя кабель USB. Если вы столкнулись с проблемами при подключении устройства через Wi-Fi, попробуйте выполнить действия из раздела “Ошибки при подключении”.
2023 Hyundai Kia Engineering Mode, Dealer Mode, Engineer Mode, hidden Android menu and secret features of radio and navigation
How to show the secret menu Engineering Mode and Dealer Mode of Hyundai & Kia & Genesis infotainment system. Sonata, Azera, Grandeur, Veloster, i30, Elantra, Accent, i20, i10, Kona, Ioniq 6, Ioniq 5, Nexo, Santa Fe, Tucson, Palisade, Creta, Venue, Staria, H-1, H-100, Stargazer, i40, ix35, ix20. Soul, e-Soul, Seltos, Sportage, Sorento, Carnival, Telluride, Niro, EV6, EV9, Rio, Forte, K5, Stinger, Picanto, Morning, Ray, K3, K8, K9, Mohave, Bongo 3, Ceed, XCeed, ProCeed, Stonic, Sonet, Carens, Optima – DAB/FM AM radio
PROCEDURE MAY VARY FROM CAR TO CAR, NOT WORKING ON ALL SYSTEMS. DO NOT CHANGE ANY HIDDEN SETTING, DO NOT USE IT WHILE DRIVING. USE IT CAREFULLY AT YOUR OWN RISK AND COST!
Engineering Mode (CTS Test, ADB Connect Type, Android Setting, All Applications)
- Press the Setup button or choose All menus -> Settings
- Choose Screensaver
- Tap below Digital – Analogue – None options from left to right and back 7 times in total (tap below Digital, Analogue, None, Analogue, Digital, Analogue, None)
- Password is the current time or 2400
- Choose Send
Engineering Mode (System, Navigation, Reception, …)
- Press the Setup button or choose All menus -> Settings
- Choose System Info
- Tap 4 times on „Firmware“ or „Map“ and tap once on its version on the same line
- Password is 1111 or 2998
- Choose Send
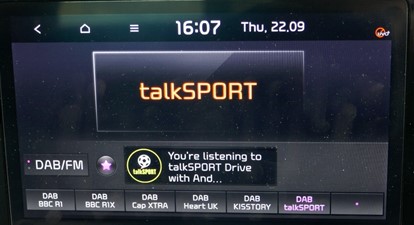
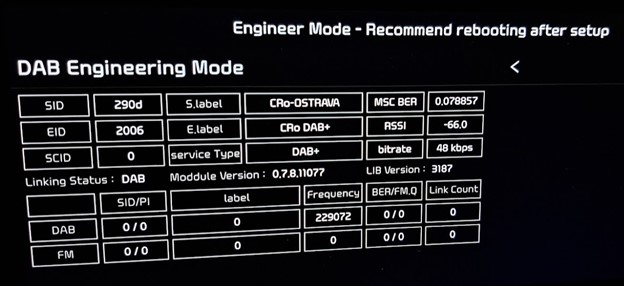
- Choose Reception -> RDS -> RDS State (TestMode); choose DAB -> DAB State (DAB Engineering Mode)
- OR
- Press the Setup button or choose All menus -> Settings
- Choose Screensaver
- Tap below Digital – Analogue – None options from left to right and back 7 times in total (tap below Digital, Analogue, None, Analogue, Digital, Analogue, None)
- Password is the current time or 2400
- Choose Send
- Choose All Applications
- Choose 3rd Engineering Mode from the top (not the first Engineering Mode, not the DAB Engineering Mode)
- OR
- Press the Setup button or Choose All menus -> Settings
- Choose System Info
- Press the left knob (volume) to turn off the AV
- In the dark part of the screen tap 4 times in the right bottom and once in the left bottom
- OR
- Press the Setup button or choose All menus -> Settings
- Choose System info to see last 6 digits of the Software version (e.g. 221117)
- Choose Update
- Imagine the dark part of the screen is a phone dial with buttons 1 to 9 and the button 0 is in the left bottom of the whole screen
- On the imaginary dial enter last 6 digits of the Software version (e.g. 221117)
- Password is the current time + last 4 digits of the Software version (e.g. current time is 15:48 -> enter 15481177)
- Choose Send
Engineering Mode (All in One Version, …)
- Press the Setup button or choose All menus -> Settings
- Choose System Info OR General
- Tap 5 times left from the Update button and tap once right from the Update button or choose Storage and in the dark part of the screen tap 5 times in the left bottom and once in the right bottom
- Password is 2900 or 2400 or 2702 or 2801 or 2603 or 2504 or 2405 or 2306 or 2207 or 2108 or 2009 or 2014
- Choose OK
- Choose Module Info
- Choose FM -> Launch FM Engineering Mode; choose AM -> Launch AM Engineering Mode; choose DAB -> Launch DAB Engineering Mode
- OR
- Choose Radio -> FM
- Set the volume to 2
- Press the Setup button or choose All menus -> Settings
- Choose General
- Tap 5 times left from the Update button and tap once right from the Update button
- Password is 2900 or 2400 or 2702 or 2801 or 2603 or 2504 or 2405 or 2306 or 2207 or 2108 or 2009 or 2014
- Choose OK
- Choose OK
- Choose Module Info
- Choose FM -> Launch FM Engineering Mode; choose AM -> Launch AM Engineering Mode; choose DAB -> Launch DAB Engineering Mode
Engineer Mode (Full Engineering Mode) – 2 knobs
- Choose Radio
- In a quick sequence set the volume using left knob to level 0, then to level 7 and press the right knob, then set the volume to level 3 and press the right knob, then set the volume to level 1 and press the right knob
- Password is 0428 or 0652 or 500625 or 19500624 or 27021427 or 26031236
- Choose Dynamics -> Radio
Engineer Mode (Full Engineering Mode) – 1 knob
- Set the volume to 0
- Press and hold the Star button
- Choose VOL knob -> Browse media, map zoom in/out
- Choose Home
- On the steering wheel set the volume to level 7 and press the Volume knob, then set the volume to level 3 and press the Volume knob, then set the volume to level 1 and press the Volume knob
- Password is 0652
EngineerMode (System, Diagnostics, Location, Radio, Voice Recognition)
- Press the Setup button or choose All menus -> Settings
- Choose General -> System info -> Memory
- In the dark part of the screen perform 6 taps in a quick sequence: Tap once below „Available…“ and the orange/grey line, tap 2 times below „Used for…“ and the orange/grey line, tap once above the orange/grey line between „Used for…“ and „Available…“, tap once below the middle of the orange/grey line and tap once below „Available…“ and the orange/grey line
- Password is 1032580 + minutes of current time (e.g. current time is 15:48 -> input 103258048)
- Choose OK
Dealer Mode (Diagnostics, Location, Media, Radio, Smart Pure Air Version Info/Update)
- Press the Setup button or choose All menus -> Settings
- Choose System Info
- In a quick sequence set the volume using left knob to level 0, then to level 7 and press the right knob, then set the volume to level 3 and press the right knob, then set the volume to level 1 and press the right knob
- Password is 2400
- Choose Send
- OR
- Press the Setup button or choose All menus -> Settings
- Choose General -> System info -> Version info/Update
- In a quick sequence set the volume to level 7 and tap on the word „Update“ in the title Version info/Update, then set the volume to level 3 and tap on the word „Update“ in the title Version info/Update, then set the volume to level 1 and tap on the word „Update“ in the title Version info/Update
- Password is 2400
- Choose OK
DAB 1 – Overview (Freq, …)
Testmode on older systems – GEN 1.x, GEN 2.0
- Go to the Radio mode
- Press and hold the Setup button until a screen with device information appears
- Touch and hold the screen in the middle until „Testmode“ screen appears
- Choose OK
- Password is 123456
- Choose OK
Hidden service menu on older systems – A-200FDE etc.
- Acc on, radio off
- Press and hold preset keys „1“ and „4“ together for 6 seconds
- Press the preset key „1“ 4 times (1111)
- Press the preset key „4“ to display settings for RDS
WATCH RELATED VIDEOS:
PROCEDURE MAY VARY FROM CAR TO CAR, NOT WORKING ON ALL SYSTEMS. DO NOT CHANGE ANY HIDDEN SETTING, DO NOT USE IT WHILE DRIVING. USE IT CAREFULLY AT YOUR OWN RISK AND COST!

